I think it's safe to say that my absolute favorite way to create is by transforming found objects and vintage components into new treasures.
I'm sure we've all seen these woven wicker glass holders before. I bought a stack of these at a garage sale a few years ago, and all this time they've been patiently waiting for me to find a good use for them.
After failing to find glasses to fit inside, I finally figured out an attractive and functional design.
How cute are these?
 |
| Antique Crocheted Doily, Silk Ribbon, Rhinestone Button Grape Hyacinths in Votive Cup |
 |
| Red Ticking Fabric, Raffia Bow, Skinny Breadsticks |
 |
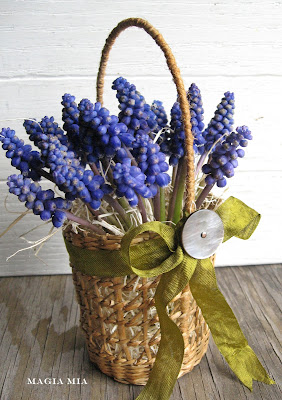
| Moss Seam Binding Ribbon, Abalone Button, Excelsior Grape Hyacinths in Votive Cup |
This is such a no-brainer project, I really don't know why it took me so long to have this epiphany. Since the basket body is already done, you only need to add the handle. I've never been interested in tedious basket-weaving, but I am certainly willing to sew in a handle. I say "sew" loosely, because all you're doing is threading jute twine around the wire and basket to hold them together. I chose jute because I wanted the handle to A) look rustic, and B) match the basket.
All I used was jute twine, tie wire ( readily available at Lowe's, Home Depot, etc), and an upholstery needle with an eye that will hold jute. I had a large needle with a slightly curved point, which did make it a bit easier
for maneuvering through the basket.
I use tie wire because it's very malleable, yet sturdy.
Some of these glass holders are squishier/softer than others,
so adding the wire handle reinforces the basket, making it more functional.
(P.S. You could use coat hanger wire, but it's much harder to bend curvy.)
I cut the tie wire in a length, that when bent into a handle, the handle area above the basket was about the same height as the basket body itself. I didn't want the handle to be any shorter, as there wouldn't be enough clearance for the contents. For my handle size, I cut a jute length of about 5 feet, to make sure I didn't run out of jute in the midst of sewing. I like the balanced look of this handle length,
but you could certainly make the handle longer if you wanted to hang the baskets
from a tree branch or door knob.
I bent a small loop at the wire ends, so I could secure them to the basket better and keep the handle from slipping out when in use.
When I made the first basket, I attached the wire to the outside, which wasn't bad, but I ultimately chose to run it along the inside for a smoother exterior. If the inside proves too confining for your hands to thread, then just go for the outside. Just make sure to thread enough jute around the bottom to cover the wire loop.
The advantage of sewing onto a basket, is that you can use the space between the wicker strips as your guide for the needle (just like cross stitch).
Start threading the jute from the inside of the basket, through the wire loop, aligning the wire with a vertical wicker strip. Push the needle to the outside, thread around to the other side of the strip, then back inside through the closest space, winding it around the vertical wicker strip and the wire, over and over,
all the way up the side of the basket.
(Thread around the wire loop a couple times to secure it,
before continuing up the side.)
Once you reach the top, just wind the jute around the wire handle, nice and tight so the jute doesn't slip when the handle is used. (That way, you don't need to use any glue to secure anything.) Once you reach the other end of the handle, just continue stitching right back into the basket, till you get to the bottom, threading through the wire loop a couple times to secure it, without needing to knot it. Then cut the jute inside, leaving about a 1/4" end to keep it from slipping to the outside,
and you're done! (If you prefer to secure the end with hot glue, go for it.)
This last step was a personal preference. I wanted the basket to look warmer and aged, so I brushed on Caramel alcohol ink, using a soft, thick artist brush. I inked the basket and the handle, for a uniform look, making the finished basket look like it's always been that way, with no proof of a recently-added handle.
I just showed you a few examples, but you could certainly fill these with all sorts of things. For Spring or Summer, add a little starter plant and burlap ribbon as a gift to a gardener. Couldn't you picture these in a little cafe, holding skinny breadsticks, long pretzels, small condiment bottles, tea bags, sweetener packets, etc.? Add some Easter grass and candy, or pens/pencils, and crayons. Too many options to mention!
Yes, you're right. I could just go to the craft store and buy mini baskets. But then that would defeat the purpose of transforming a treasure from something you already have, now wouldn't it.....So have fun!


google 1280
ReplyDeletegoogle 1281
google 1282
google 1283
google 1284